


7.14. The IDERI note Hotkey Support Components in Detail
The IDERI note Hotkey Support Components are an optional product package within the IDERI note product suite that allow instant creation or update of IDERI note messages with a single press of a keyboard hotkey or a simple and inexpensive hardware device like a push-button that is attached to a workstation PC via USB or bluetooth. Other device form factors include foot pedals or switches and are available from a variety of retailers and manufacturers, prices usually range from $10 to $100 for such devices.
7.14.1. Hotkey Setup
In order to set up the IDERI note Hotkey Support Components in a production environment, the IDERI note Hotkey Support Components first have to be installed via their msi (inotehid.msi) as outlined in this manual in section 3.8. After installation, the hotkeys to be executed must be configured as detailed in the paragraphs below and depending on the action to be executed as the response to the hotkey press, either the General Security Policy Settings (see section 4.4) or the security settings for individual existing messages need to be adjusted as explained below.
Configuration for the IDERI note Hotkey Support Components is performed using the control panel applet labeled “IDERI note Hotkey Support” with the version number of the installed product version appended. Running this applet will usually run it as an unelevated instance as shown in figure 7.30.
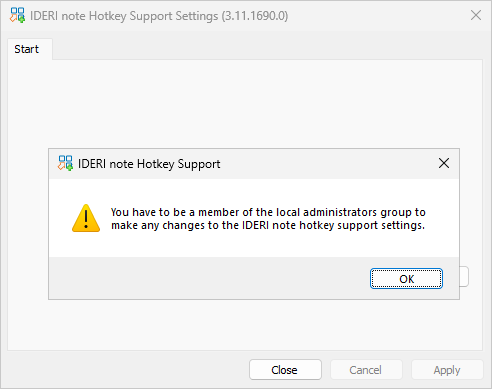
Fig. 7.30 Unelevated instance of the IDERI note Hotkey Support Components control panel applet
After dismissing the message box shown in figure 7.30, the start page of the control panel applet will be shown as in figure 7.31.
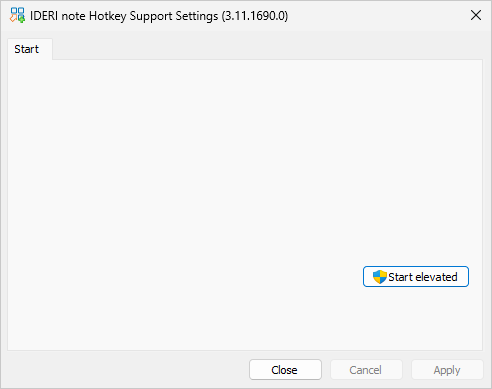
Fig. 7.31 Unelevated instance of the IDERI note Hotkey Support Components control panel applet with the start page shown
In order to configure the IDERI note Hotkey Support Components you can now press the button labeled “Start elevated”. This will show an elevation prompt for the IDERI note Hotkey Support Components control panel applet which will then be started as an elevated instance as shown in figure 7.32.
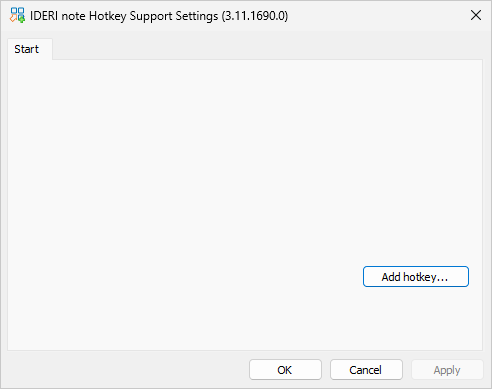
Fig. 7.32 Elevated instance of the IDERI note Hotkey Support Components control panel applet
In order to create an IDERI note hotkey, press the button labeled “Add hotkey…” and a dialog will appear as shown in figure 7.33. This dialog shows the four different types of operations that can be performed with a hotkey press:
Creation of a new IDERI note message.
Update of an existing IDERI note message.
Cancellation of an existing IDERI note message.
Cancellation of the hotkey message that was last sent from this computer.
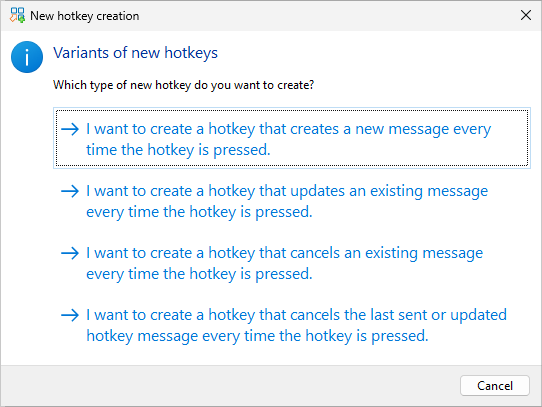
Fig. 7.33 Selection dialog for new IDERI note hotkey types
We will look at all four choices and start with the creation of a new IDERI note message.
7.14.1.1. Configuring a hotkey that creates a new IDERI note message
In order to create a hotkey that creates a new IDERI note message, select the first item in the list shown in figure 7.33. The IDERI note hotkey wizard for the creation of new messages will then appear with its welcome page as in figure 7.34.
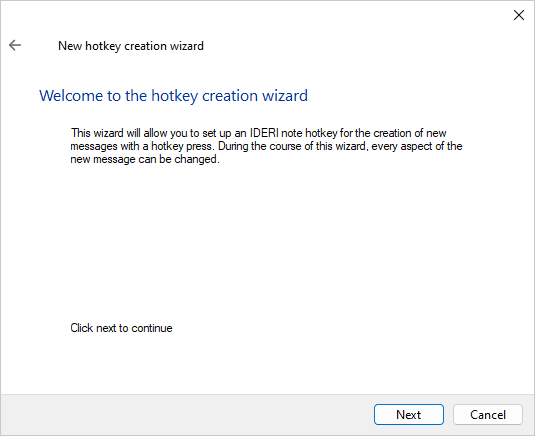
Fig. 7.34 Welcome page of the new hotkey message creation wizard
Press the button labeled “Next” and the hotkey identification page as in figure 7.35 appears. We will first give the hotkey a name (“Hotkey Test”) and an optional description (“This is a test hotkey”). After that, move the keyboard focus to the third edit box labeled “Hotkey” and press the keyboard key combination you would like to assign to this hotkey. If you have a hardware button device attached, activate the hardware button now while the keyboard focus is in the edit box and the name of the hotkey and its modifiers will appear. In our case we want to assign the Alt-F12 key combination to this hotkey.
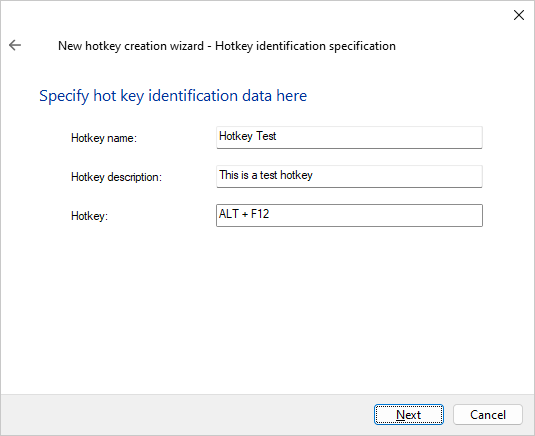
Fig. 7.35 Hotkey identification page
Remember that returning to the previous page can always be performed by pressing the familiar Alt-Cursor-Left key combination as in modern web browsers or by pressing the button at the top left of the wizard that shows an arrow pointing to the left. Now press the button labeled “Next” and the connection details page as in figure 7.36 will appear.
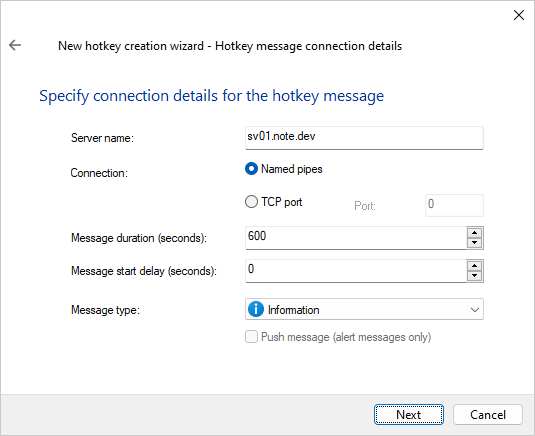
Fig. 7.36 Hotkey connection details page
We will provide the name of our IDERI note server (sv01.note.dev) and provide additional information such as the connection protocol to use and the message duration, the message delay and the message type. In case we choose an alert as the message type we can additionally specify that the message should be sent immediately to the recipients by ticking the checkbox labeled “Push message (alert messages only)”. The message delay is the number of seconds that elapse from the moment on where the hotkey is pressed until the start time of the message and should be zero in most cases. See the section below with recommendations for a use case where you could use a non-zero delay. The message duration is the number of seconds that the message should be valid from the moment on where the hotkey is activated (plus the message delay, if configured).
If you press the button labeled “Next” now, the server specified on this page will be contacted with the specified connection settings and will retrieve the default security descriptor for new messages, as outlined in section 4.3 and the wizard will advance to the next page with the message text and addressing mode as in figure 7.37.
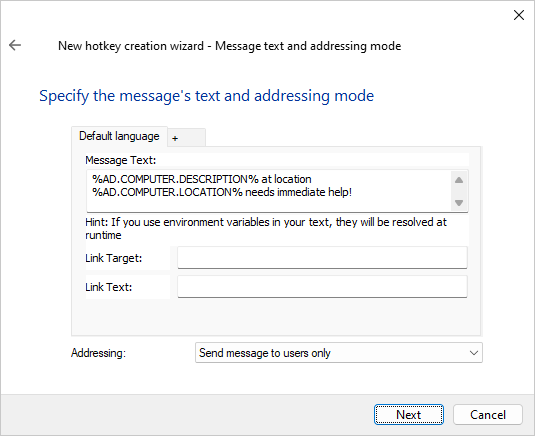
Fig. 7.37 Hotkey message text and addressing settings page
We will use the special variables that are provided with the IDERI note Hotkey Support Components (see also section 2.8.3) and supply the text “%AD.COMPUTER.DESCRIPTION% at location %AD.COMPUTER.LOCATION% needs immediate help!”. These variable values will be replaced with the actual values for the computer where the hotkey is executed at the very moment the hotkey is pressed. After pressing the button labeled “Next”, the recipients page as in figure 7.38 will appear.
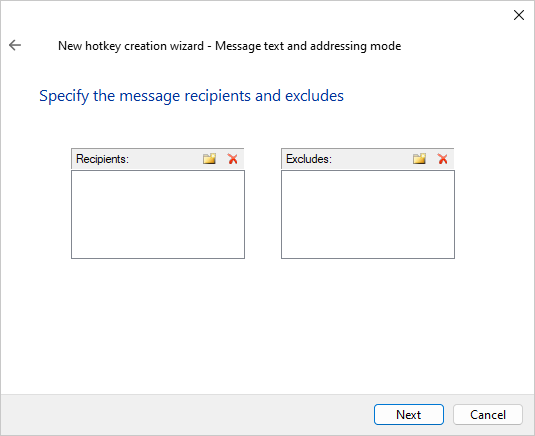
Fig. 7.38 Hotkey message recipients page
Unless the default security descriptor for new messages contains default recipients, the page will appear with empty content as in figure 7.37. For our purposes we will simply add the builtin group “Everyone” as the recipients as in figure 7.39.
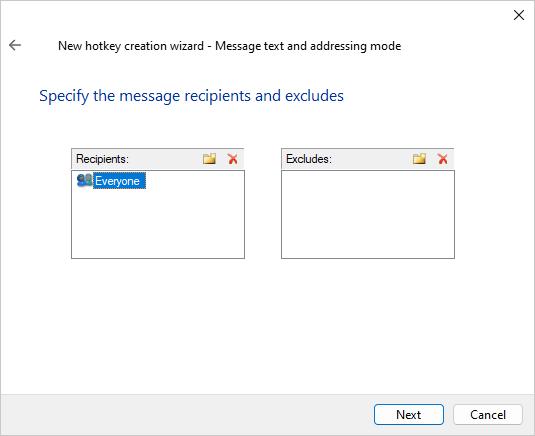
Fig. 7.39 Hotkey message recipients page with “Everyone” added as the recipients
After specifying the recipients (and excludes) for the message, press the button labeled “Next” and the message options page will appear as in figure 7.40.
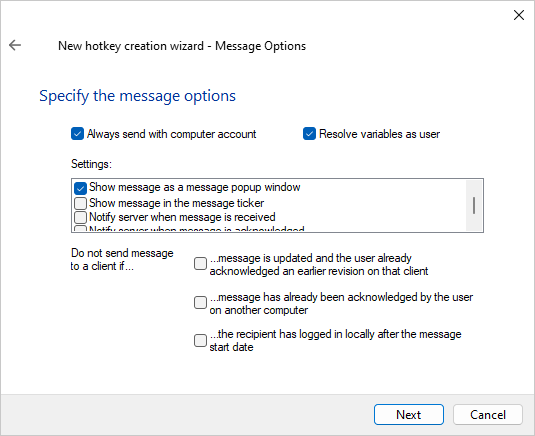
Fig. 7.40 Hotkey message options page
The options that can be specified on this page have already been covered at various other places in this manual (see e.g. section 4.9), but one setting deserves some more detailed explanation: The checkbox labeled “Always send with computer account”.
The value of this checkbox controls which principal will execute the creation of the new message when the hotkey is pressed. If this checkbox is ticked, it will always be the Active Directory® computer account principal that will perform the operation against the IDERI note server, regardless of any currently logged in user and independent from the currently active desktop. However, if this checkbox is unticked, the principal executing the creation of the IDERI note message on the IDERI note server will be the principal that is associated with the desktop that is active, when the hotkey is pressed. So if this checkbox is unticked and our user Adam.Sam from the sections 4.1 and 4.2 is logged in interactively and activates the hotkey, the new message will be created by Adam.Sam. However, if Adam.Sam is logged in interactively and locks his desktop before activating the hotkey, the message will be created by the Active Directory® computer account of the computer, where the hotkey is executed (licensing mode “professional” only), if this checkbox is unticked. By ticking this checkbox, the operation performed on the IDERI note server is always executed in the context of the Active Directory® computer account no matter which desktop is currently active. Note that any functionality of the IDERI note Hotkey Support Components with the lock screen or logon screen active is only available with servers running in licensing mode “professional”. Usage of the checkbox labeled “Always send with computer account” however, is available with both servers running in the licensing mode “professional” and servers running in the licensing mode “standard”. See the recommendations section below for additional information since the decision which principal to choose (the Active Directory® computer account or the current active user) has an impact on the security changes that need to be performed to allow those principals the creation of IDERI note messages.
The option “Resolve variables as user” determines if variables used within the message text will be resolved in the context of the interactively logged on user. If the option is unchecked, variables will be resolved in the context of the system account.
After pressing the button labeled “Next”, the network ranges page as in figure 7.41 will appear.
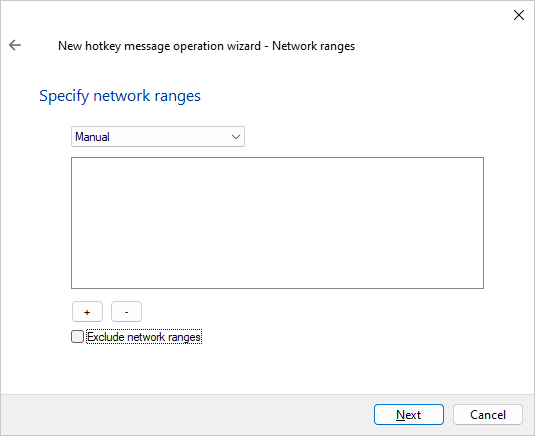
Fig. 7.41 Hotkey network ranges option page
Here you can optionally add one or more network ranges as a recipient filter.
As the next step after setting the network ranges, click the button labeled “Next” and the completion page of the new hotkey message wizard will be shown as in figure 7.42.
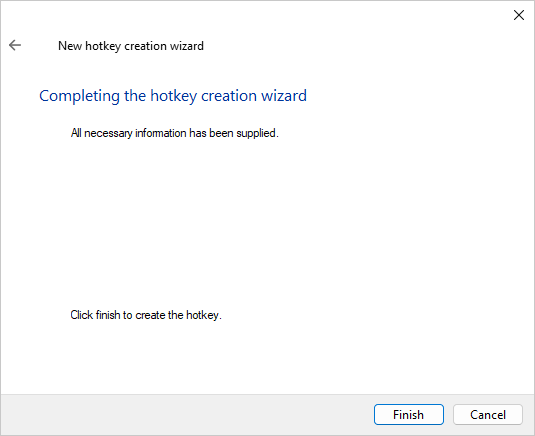
Fig. 7.42 Completion page of the new hotkey message creation wizard
Now click the button labeled “Finish” and the new hotkey will be created as a new page on the control panel applet like in figure 7.43.
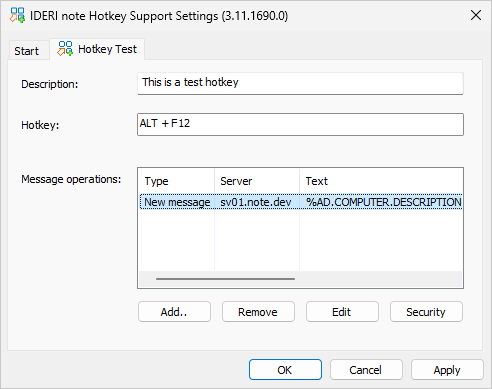
Fig. 7.43 Page for the new hotkey in the control panel applet
As you can see, the most important configuration information is visible on the page for the new hotkey now and can also be changed here. In order to save your changes now to the local configuration store, press the button labeled “Apply” now. The hotkey that has just been created also has a single entry now in the list control labeled “Message operations” where we can add more operations later, that will also be executed when the hotkey is pressed. For now, select the first entry in this list and either perform a double click on it or click the button labeled “Edit”. This will invoke the message configuration dialog as in figure 7.44.
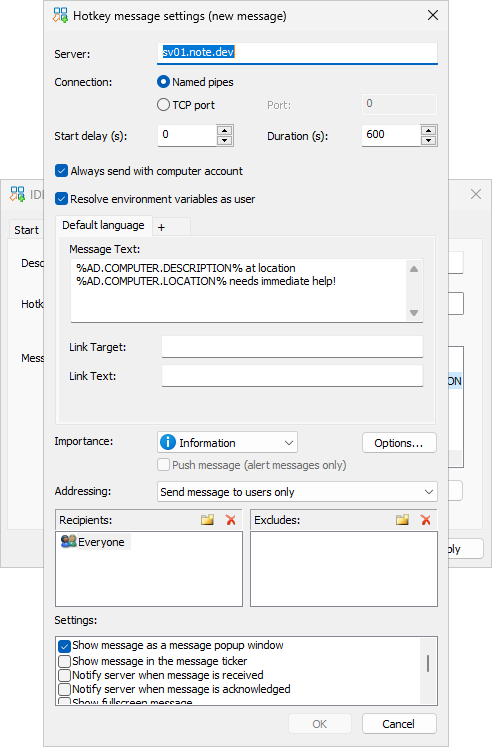
Fig. 7.44 Configuration dialog for the new message
Using this dialog, you can change the parameters for the message to be created upon a hotkey press, such as the message text, message options or connection parameters.
7.14.1.2. Configuring a hotkey that updates an existing IDERI note message
In order to update an existing message using the IDERI note Hotkey Support Components, start creating a hotkey like in figure 7.32 and press the button labeled “Add hotkey…”. Again, the dialog as in figure 7.33 will appear. This time however, choose the second option that updates an existing message and a wizard will appear that is similar to the one that creates a new message upon hotkey press. The first two pages of this wizard are almost identical to the pages shown in figure 7.34 and figure 7.35 so they do not require further explanation. For the purposes of this tutorial we will give the new hotkey for the message to be updated the name “Message update” and the description “This is a message update” on its hotkey identification page. The page following the hotkey identification page however looks a bit different and is shown in figure 7.45.
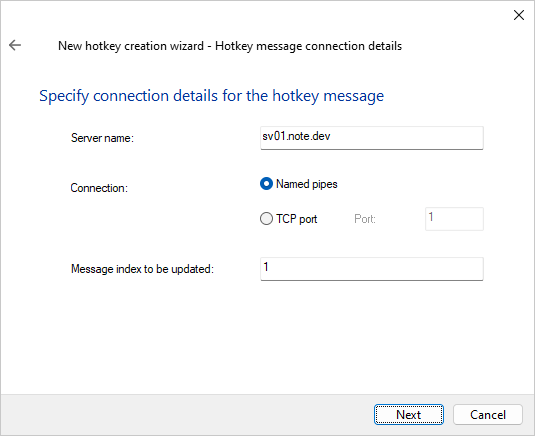
Fig. 7.45 Connection details page for messages to be updated
On this page, the connection details to the IDERI note server have to be provided as well as the message index to be updated on that server. The message index to be updated is a-priori knowledge that you need to have when configuring a hotkey for a message to be updated and should be looked up beforehand using the IDERI note administrator on the same or a different computer. After specifying the message index to be updated, continue to the next page in this wizard by pressing the button labeled “Next” and the IDERI note server will be contacted in order to retrieve the message with the message index provided. The current content of the message will then be used to fill out the remaining pages of this wizard. The next page to appear on this wizard is the message details page as in figure 7.46 where the message type will already be initialized with the current type of the message at the specified index. In our case this is an alert message so the message type combobox will already have the alert message type selected.
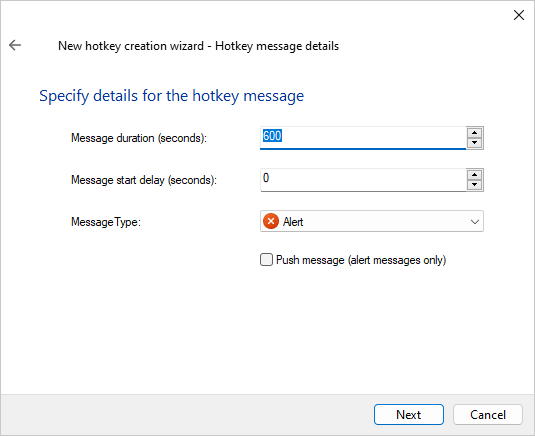
Fig. 7.46 Details page for the message to be updated
On this page you can configure the duration and the delay of the message, as well as the message type and optionally an immediate message push operation. After pressing the button labeled “Next”, the page for modifying the message text and addressing mode will appear as before in in figure 7.37, but this time already with the current content of the message filled. Now press again the button labeled “Next” and the page for the recipients and excludes for the message to be updated will appear, just like before in figure 7.38. This time however, the page will already be populated with the current recipients and excludes of the message at the specified message index.
After specifying the recipients (and excludes) for the message to be updated, press the button labeled “Next” and as before, the message options page will appear as previously shown in figure 7.40. In the end, pressing the button labeled “Next” will now advance to the wizard completion page which looks almost identical to the completion page of the wizard for the creation of new messages as already shown in figure 7.42. Click the button labeled “Finish” and the hotkey for the update of an existing message will be created as in figure 7.47.
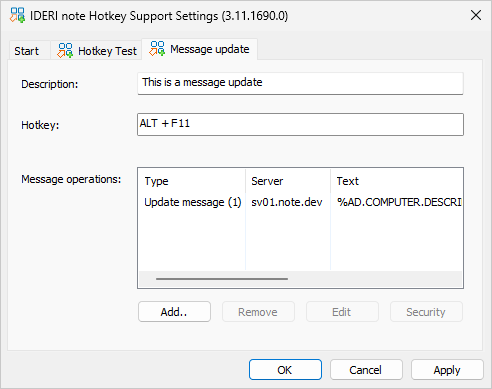
Fig. 7.47 Page for the new message update hotkey in the control panel applet
Notice that a new page with the name “Message update” has been created in addition to the previous hotkey with the name “Hotkey Test” and that the type of this message operation is now “Update message” with the index of the message to be updated appended and in parantheses. You can now edit this hotkey operation with a double click on its list control entry or with a click on the button labeled “Edit”. This will invoke the message configuration dialog as in figure 7.48.
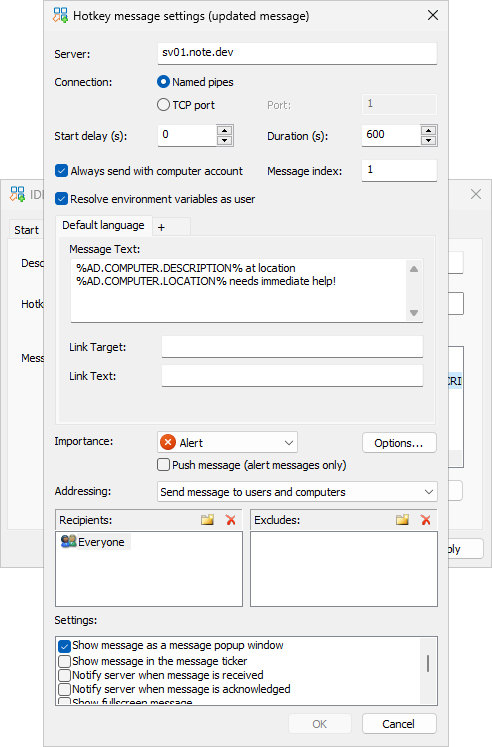
Fig. 7.48 Configuration dialog for the message to be updated by the hotkey
This dialog looks almost the same as the dialog in figure 7.44 that was shown previously for a new message to be created, except for the addition of the edit box labeled “Message index”.
After creating the new hotkey you should save the configuration changes by pressing the button labeled “Apply”.
7.14.1.3. Configuring a hotkey that cancels an existing message
Cancellation of a message with the IDERI note Hotkey Support Components works the same way as with the IDERI note administrator as outlined in section 4.11: The message will receive the current date and time as its start and end date. A common use case for the cancellation of an IDERI note message would be a setup where one hotkey would be devised for the update of an existing message and another hotkey would be devised for cancellation of the same message. So the first hotkey would trigger an alert by updating the message and a second hotkey could be used to give the all-clear. In order to set up a hotkey that cancels an existing message, you need a-priori knowledge about the index of the message to be canceled. Use the IDERI note administrator to determine the index of the message. Then click again the button labeled “Add hotkey…” on the Start page of the IDERI note Hotkey Support Components control panel applet and choose the third option in the dialog as previously shown in figure 7.33. This will invoke the hotkey message cancellation wizard that starts with a welcome page and a hotkey identification page similar to the ones shown before in figure 7.34 and figure 7.35. For the purposes of this tutorial we will give the new hotkey for the message to be cancelled the name “Message cancellation” and the description “This is a message cancellation” on the hotkey identification page. The third page in this wizard looks almost identical to the connection details page as in figure 7.45 except for the addition of the checkbox labeled “Always send with computer account”. Again, this checkbox is used to determine the security principal under whose auspices the cancellation operation is to be performed: If checked, the operation is always performed with the Active Directory® computer account principal. If unchecked, the principal that is running the currently active desktop is used for the operation, so it will be the Active Directory® computer account if the workstation is locked and the interactive user if the workstation is unlocked. Figure 7.49 shows this wizard page.
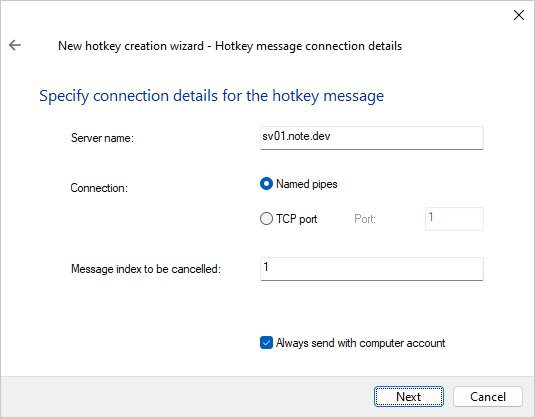
Fig. 7.49 Connection details page for the message cancellation hotkey wizard
After making the necessary changes on this page, click the button labeled “Next” and the wizard completion page will appear, which looks almost identical to the completion page shown in figure 7.42. After clicking the button labeled “Finish” on the completion page, the new hotkey will be created as a new property page on the IDERI note Hotkey Support Components control panel applet as in figure 7.50.
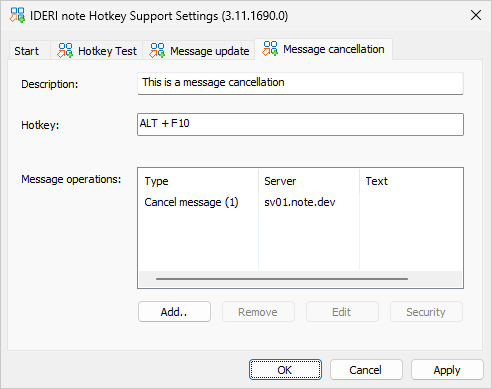
Fig. 7.50 Page for the new message update hotkey in the control panel applet
Notice that the type of the hotkey in the list control for the newly created cancellation hotkey is now “Cancel message” with the index of the message to be cancelled appended and in parantheses.
You can now edit this hotkey operation with a double click on its list control entry or with a click on the button labeled “Edit”. This will invoke the cancellation message configuration dialog as in figure 7.51.
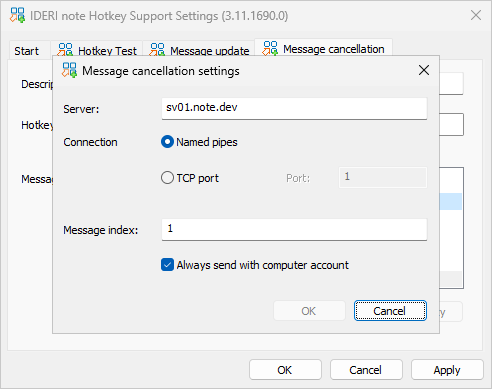
Fig. 7.51 Configuration dialog for the message to be cancelled by the hotkey
After creation of this hotkey you should press the button labeled “Apply” in order to save the newly created hotkey.
7.14.1.4. Configuring a hotkey that cancels the message that was last created or updated from a hotkey locally
The most simple hotkey operation that can be configured for the IDERI note Hotkey Support Components is the cancellation of the last created or updated message. This works in much the same way as the cancellation of an existing message as outlined in the previous paragraph, except for the lack of any configuration options. In order to set up a hotkey that cancels the last created or updated message, click again the button labeled “Add hotkey…” on the Start page of the IDERI note Hotkey Support Components control panel applet and choose the fourth option in the dialog as previously shown in figure 7.33. This will invoke the message cancellation wizard for the last created or updated message. This wizard starts again with a welcome page and a hotkey identification page similar to the ones shown before in figure 7.34 and figure 7.35. For the purposes of this tutorial we will give the new hotkey for the cancellation of the last created or updated message the name “Last Message cancellation” and the description “This is a cancellation of the last sent or created hotkey message” on the hotkey identification page. After clicking the button labeled “Next” on the hotkey identification page, the wizard completion page will be shown immediately and looks almost identical to the wizard completion page in figure 7.42. After clicking the button labeled “Finish” on the completion page, the new hotkey will be created as a new property page on the IDERI note Hotkey Support Components control panel applet as in figure 7.52.
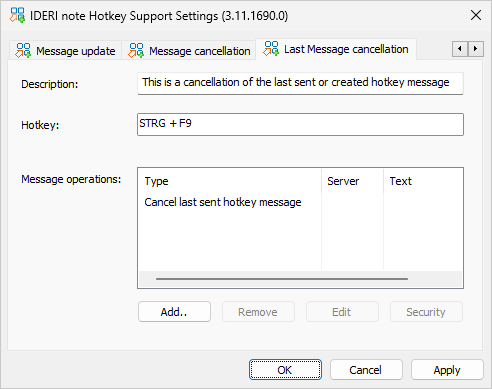
Fig. 7.52 Page for the cancellation of the last created or updated hotkey in the control panel applet
Notice that the type of the hotkey in the list control for the newly created cancellation hotkey is now “Cancel last sent hotkey message”.
You cannot edit this hotkey operation with a double click on its list control entry or with a click on the button labeled “Edit”, simply because there is nothing to configure, and as a consequence, a message box as in figure figure 7.53 will appear.
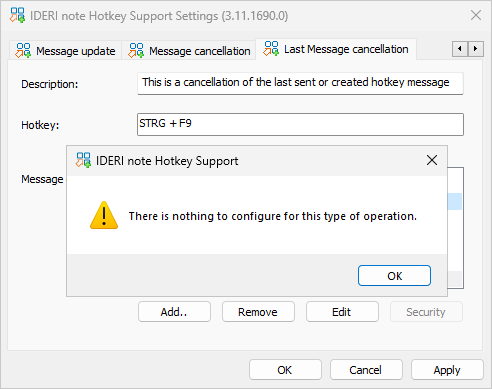
Fig. 7.53 The hotkey operation for the cancellation of the last sent or updated message cannot be configured
After creation of this hotkey you should press the button labeled “Apply” in order to save the newly created hotkey.
Cancellation of the last sent or updated hotkey message doesn’t need any configuration because it only relies on volatile in-memory data of the inthidsvc service component. The inthidsvc service will always execute any type of hotkey operation, be it with the Active Directory® computer account or by impersonating the logged on user. Any time the service executes a hotkey operation that creates or updates a message, it stores the required connection details to the server being used, the message index and the impersonation information (that is reflected with the various checkboxes labeled “Always send with computer account” in the user interface). If a hotkey operation for the cancellation of the last created or updated message is executed, the inthidsvc service will simply use this in-memory data and cancel the message using this information. This also implies that cancellation of the last created or updated message will not work across computer reboots or restarts of the inthidsvc service component.
7.14.1.5. Adding message operations to an existing hotkey
Up to now this chapter has only covered the creation of new hotkeys and the result of each hotkey creation wizard was a single message operation associated with a hotkey press. Sometimes this is simply not enough, such as when multiple IDERI note messages to multiple IDERI note servers within an organization have to be created, updated or cancelled with a single hotkey. In order to do so, take a closer look at e.g. figure 7.43 where we created a hotkey that creates a new message on the server sv01.note.dev. In order for an additional message to be created on another server, e.g. on a hypothetical server named sv03.note.dev, simply click the button labeled “Add…” on the hotkey control panel applet page and a dialog like in figure 7.54 will appear.
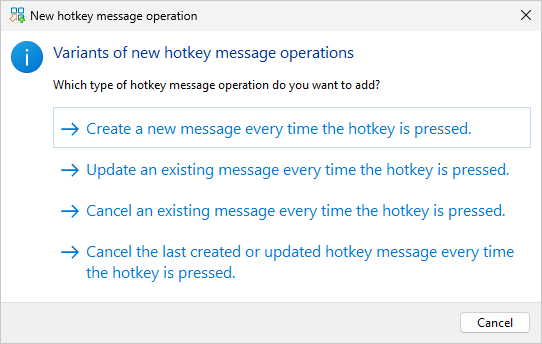
Fig. 7.54 Selection dialog for additional IDERI note message operation types
This dialog again shows the four different types of operations that can be performed with a hotkey press:
Creation of a new IDERI note message.
Update of an existing IDERI note message.
Cancellation of an existing IDERI note message.
Cancellation of the hotkey message that was last sent from this computer.
Now choose the first item in the list and the wizard for the addition of a new hotkey operation that creates a new message will appear. All wizards that are created from the dialog shown in figure 7.54 are identical to the wizards presented in the previous paragraphs that were invoked from the control panel applet’s start page and the dialog shown in figure 7.33, except for the lack of a hotkey identification page as shown e.g. in figure 7.35. Since we are adding an operation to an existing hotkey this way, the hotkey identification is implicit. Adding a new operation with the creation of a new message on our hypothetical server named sv03.note.dev is then simply a matter of running a similar wizard as above with a different server name or connection details specified. You can also specify a completely different text, message type, addressing mode, message options, etc. for the hotkey operation to be added. After adding the new operation, the hotkey page as shown in figure 7.43 will change to something like in figure 7.55.
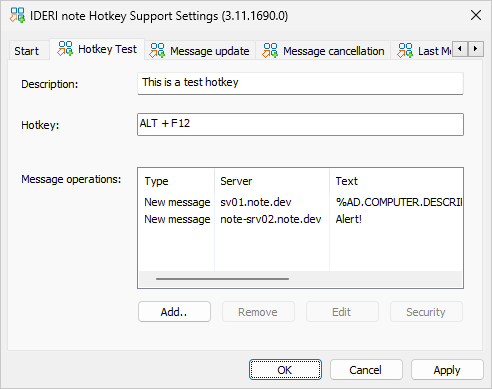
Fig. 7.55 Control panel applet page with an additional message creation operation on server sv03.note.dev
7.14.1.6. Deleting message operations from a hotkey and deleting hotkeys
Deleting a message operation from a hotkey is simply a matter of selecting the operation on the hotkey page and clicking the button labeled “Remove”. This will remove the message operation from the hotkey. A hotkey itself is deleted if the last message operation is deleted from it.
7.14.1.7. IDERI note server configuration changes and hotkey operation security considerations
Like any part of IDERI note, the IDERI note Hotkey Support Components are also subject to the security mechanisms in IDERI note that use integrated Windows security for all business logic decisions like creation of a new message or updating an existing message. Keep in mind that in order for any principal to create a new message, the security configuration of your IDERI note server has to allow this. You can do this either using the general security settings as outlined in section 4.4 or by using recipients list as described in section 4.14.
Updating or cancelling an existing message is a completely different story: For an existing message, any operation against it is checked against the message’s own security descriptor. So you have to make sure that the principal changing the message is allowed to do so from the point of view of the message’s security descriptor which can be viewed and changed from the security page of the messages property dialog in IDERI note administrator like in section 4.2 and figure 4.8. Make sure that your principal has at least the access right “Modify Messages” and possibly the access right “Change permissions” if the recipients or excludes change with the message update triggered by the hotkey operation.
Also keep in mind that the principal executing a hotkey operation with the “Always send with computer account” checkbox ticked is the Active Directory® computer account, so you have to grant this computer account - or better yet - an Active Directory® group containing this computer account the necessary access rights when changing any security configuration, be it the general security settings from section 4.4 or an individual message’s security settings as outlined in section 4.2.
7.14.1.8. Hotkey message security settings
When creating a hotkey operation for a new message, the default security descriptor for new messages is retrieved from the specified server during the course of the hotkey wizard as outlined above. On the recipients page you can add or remove recipients and excludes, but other message access rights like the right to read or write the messages discretionary access control list are untouched during the course of the hotkey operation creation wizard. The same is true for the wizard for hotkey operations that update an existing message, where the current security descriptor of the message to be updated by the hotkey is retrieved and the recipients and excludes can be modified in a similar fashion on the recipients wizard page. In order to be able to fine-tune the security descriptor and its discretionary access control list, you can always change the security descriptor of messages to be created anew or updated with a hotkey. Simply select the message operation on the list control of the hotkey’s control panel applet page and click the button labeled “Security” or invoke the context menu on the list control entry and select the menu item labeled “Security”. This will then show the standard dialog for changing the security descriptor as in figure 7.56.
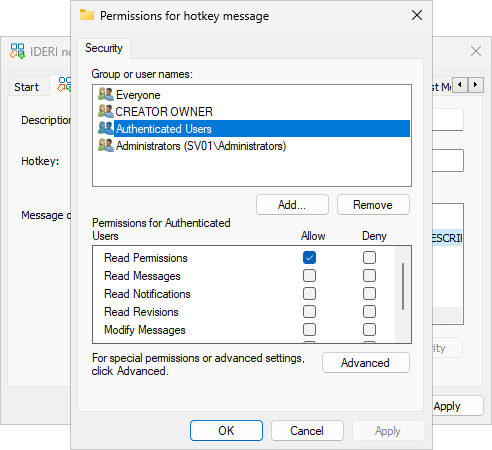
Fig. 7.56 Hotkey message security settings dialog
Note that this will not change any security settings of messages on the server being used for the hotkey operation. It will only change the settings for the message to be created on the local computer, which acts like a blueprint for a new message to be created or an existing message to be updated with the associated hotkey press.
7.14.2. Cooperation with Screensavers and Power Save Modes
Unfortunately, the IDERI note Hotkey Support Components do not work with a screensaver enabled. You should disable any screensaver on a computer where the IDERI note Hotkey Support Components are installed. Since the majority of corporate Windows installations use the default configuration with screensavers disabled and only the screen locked or the monitor turned off after a certain timeout elapses, this should not be a problem for the majority of IDERI note customers. Anyway, the IDERI note development team is aware of this limitation and is investigating it.
You should also turn off power save modes for the workstation PC where the IDERI note Hotkey Support Components are installed, otherwise any key press with an IDERI note hotkey will be “swallowed” by the operating system in order to wake up the computer from its sleep state instead of sending an IDERI note message as intended.
This does not mean that the IDERI note Hotkey Support Components do not work at all on computers with screensavers or power save modes active. As soon as the computer has left the screensaver mode or the power save mode, the IDERI note Hotkey Support Components will work again, because either the user’s desktop will be active again or the logon screen will be shown where the IDERI note Hotkey Support Components can operate again normally.
7.14.3. Testing the operation of hotkeys
Prior to purchasing an actual hardware device you can easily test the operational functionality by activating an IDERI note hotkey simply by performing the actual keypress using the standard keyboard that is attached to the workstation PC.
Additionally, the IDERI note Hotkey Support Components provide a very convenient way of testing their operation without accidentally creating a false alarm. Be sure to hold down both mouse keys while activating an IDERI note hotkey and the same sequence of operations will be executed for the hotkey as configured, but with the start and end date of any newly created or updated message being set to one year in the past. Message operations that cancel a message will be executed as configured. This way you can verify the correct operation of your hotkey operation without actually sending a real message that is shown to users currently running the IDERI note client, because the IDERI note client will not display messages entirely from the past.
When executing a hotkey via the context menu of the hotkey support’s icon in the system notification area, this test functionality is invoked if both the Shift key and the Ctrl key are pressed simultaneously while executing the hotkey operation.
7.14.4. Architecture and Components
The IDERI note Hotkey Support Components’ architecture is based around the service inthidsvc (running as LocalSystem, thus authenticating with the Active Directory® computer account across machine boundaries) and a companion application (inotehid.exe) that is started on the user’s desktop via the REG_SZ value “ideriHID” in
HKEY_LOCAL_MACHINE\Software\Microsoft\Windows\CurrentVersion\Run.
Both the service and the companion application work in tandem and detect and send the hotkey operation requests according to their configuration information to the IDERI note servers upon a hotkey press.
Since the companion application is started by explorer.exe during login, a server core installation needs an alternative way to start the inotehid.exe companion application, such as a logon script or similar. It is up to the customer to make sure that inotehid.exe is started correctly in the context of the logged in user on such systems. Also note that depending on the load and the amount of automatically started processes during login, there is some small period of time immediately after the user login, where hotkey operation is not yet possible, until the companion app is fully running and operational. The companion app will create an icon in the system notification area that indicates its presence like in figure 7.57.
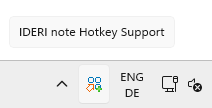
Fig. 7.57 IDERI note Hotkey Support Components system tray notification icon
This icon will also give visual feedback about success or failure of hotkey presses on the desktop of the logged in user. Unfortunately, there is not yet a counterpart for hotkey presses when the logon screen is active.
Hotkey configuration is performed via the IDERI note Hotkey Support Components’ Control Panel Applet as described above.
7.14.5. Dynamic Network Ranges
Other than the IDERI note Administrator or the IDERI note Command Line Components, the IDERI note Hotkey Support Components are capable of creating messages via a hotkey press that are not only associated with a static set of network ranges, but instead with a dynamically determined set of network ranges that are derived from the current IP address of the computer where the hotkey is triggered. Depending on the actual configuration, this makes it possible to send messages via hotkeys only to computers that are in the same network segment as the computer where the hotkey was triggered. Please note the following: When we say below that a computer has or uses an IP address, we always mean the IP address that the computer actually uses to connect to its IDERI note server, since a computer can have a whole number of IP addresses with different network adapters. So what is essential for the dynamic network range functionality is always the IP address of a computer that it actually uses to connect to its IDERI note Server .
Figure 7.58 shows the configuration page for network ranges in the wizard for the creation of a new message.
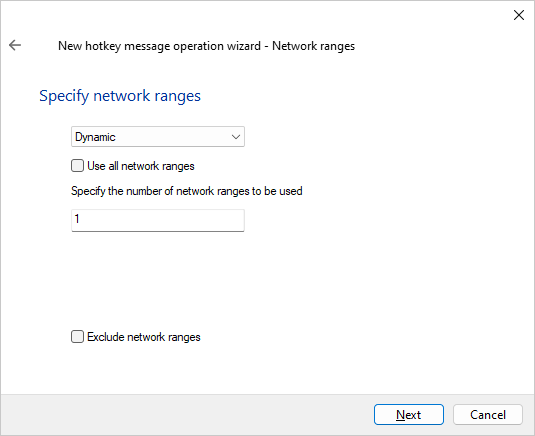
Fig. 7.58 Page for dynamic network ranges in the new hotkey message creation wizard
If the option field is set to Dynamic, one configuration option could be to use all network ranges that have been configured on the IDERI note Server that have a match with the sending client’s IP address. As an alternative, a certain number of network ranges to be used can be specified. If the latter is chosen, always the network range with the fewest number of IP addresses within its range, that also matches the client’s IP address, is selected to be used with a new message created from the hotkey.
In order to better understand how this functionality works, we will use a series of examples below. In these examples, we assume that the IDERI note server in use is operating in Professional license mode.
7.14.5.1. Example 1:
This example assumes that three network ranges have been defined in IDERI note and are configured as follows:
Network Range Name |
IP Address Range |
|---|---|
Berlin Office |
192.168.70.0 - 192.168.70.255 |
Berlin Office HR |
192.168.70.1 - 192.168.70.30 |
Stuttgart Office |
192.168.5.0 - 192.168.5.255 |
Subsequently, a hotkey message using dynamic network ranges is defined for the IDERI note Hotkey Support Components on a computer named CLIENT01, which has the built-in group Everyone as the recipient, i.e. this hotkey message addresses all users in the AD. For this hotkey message, the option “Use all network ranges” is selected as shown in figure 7.59.
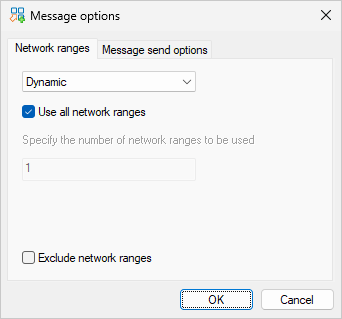
Fig. 7.59 Using all matching network ranges dynamically
In this example, CLIENT01 is located in the Berlin office and is connected to the IDERI note server via the IP address 192.168.70.22. If the hotkey is now triggered on CLIENT01, the network range “Berlin Office” and “Berlin Office HR” is automatically used for the IDERI note message, since the current IP address of this computer is part of these two IP address ranges. This means that the message will only be displayed on PCs that are currently connected to the IDERI note server via an IP address in the 192.168.70.x range.
However, if CLIENT01 is in the Stuttgart office, it gets an IP address from the 192.168.5.x network. If the hotkey is now triggered, the message will only be displayed on computers in the Stuttgart office.
7.14.5.2. Example 2:
This example assumes that CLIENT01 has the IP address 192.168.70.22 and that several network ranges have been defined in IDERI note which are configured as follows:
ID
Network Range Name
IP address ranges
Number of IP addresses
1
Berlin Office
192.168.70.0 - 192.168.70.255
254
2
Berlin Office EG
192.168.70.1 - 192.168.70.50
50
3
Berlin Office 1st floor
192.168.70.51 - 192.168.70.100
50
4
Stuttgart Office
192.168.5.0 - 192.168.5.255
254
5
Stuttgart Office EG
192.168.5.1 - 192.168.5.25
25
6
Stuttgart Office 1st floor
192.168.5.26 - 192.168.5.50
25
7
IT department
192.168.70.20 - 192.168.70.30
192.168.5.10 - 192.168.5.1511
6
CLIENT01 would therefore be part of the network ranges with ID 1, 2 and 7. A hotkey is now defined in the IDERI note Hotkey Support Components on CLIENT01, which has the built-in group Everyone as the recipient, thus addressing all users in the AD. The number of network ranges to be used is set to 1, as can be seen in figure 7.60.
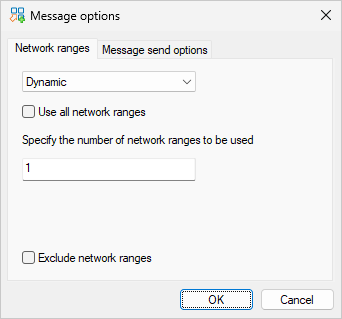
Fig. 7.60 Number of dynamic network ranges to be used
If the hotkey on CLIENT01 is now triggered, the network range with the smallest number of IP addresses that the triggering computer fits into is used with the new IDERI note message. In this case this is the network range with ID 7 - “IT department”.
However, if the number of network ranges to be applied is defined as 2, in this example the network ranges with ID 7 and 2 would be used with the message.
7.14.6. Limitations
The IDERI note Hotkey Support Components cannot work as expected if a computer enters sleep states, so it is up to the customer to correctly configure a computer with the IDERI note Hotkey Support Components installed. In the current version, running screensavers is also not a supported option but may be removed in future versions of the product. See also section 7.14.2 for more information.
The IDERI note Hotkey Support Components are fully supported with the IDERI note professional licensing mode. Activating hotkeys while the logon screen is active is not supported with the standard licensing mode. The lite licensing mode is not supported with the IDERI note Hotkey Support Components. Note also that operating the IDERI note Hotkey Support Components is not supported in workgroup scenarios.
Inbetween switching from the user desktop to the logon screen desktop there is a short period of time (at most 1~2s at normal computer load) that the inotehid.exe program requires to adapt to the newly activated desktop.
7.14.7. Mass deployment of an IDERI note Hotkey Support Components configuration
All configuration for the IDERI note Hotkey Support Components is stored in the following registry key:
HKEY_LOCAL_MACHINE\SOFTWARE\ideri\inotehkdef on x86 computers and
HKEY_LOCAL_MACHINE\SOFTWARE\WOW6432Node\ideri\inotehkdef on x64 computers.
This key can be exported into a .reg file on a computer where the IDERI note Hotkey Support Components have been fully configured and successfully tested. This .reg file can then be used to configure the IDERI note Hotkey Support Components on a different computer by executing this .reg file locally (make sure to delete this key beforehand if already present and to reboot the computer after merging the .reg file).
This key is left untouched if the IDERI note Hotkey Support Components are uninstalled, so it is up to the customer to manually delete this key if the IDERI note Hotkey Support Components are to be uninstalled permanently. Normal update cycles with new versions of the IDERI note Hotkey Support Components will not delete or manipulate this key.
Tip
Ex- and import of configurations with line breaks in message text
The message text is stored as a REG_SZ value. As an export using the regedit.exe creates a .reg file that holds the data as text, the import of a message containing line breaks will not be imported correctly. Therfore an ex- and import of the values in binary format is a much better approach. This can be achieved by executing the following commands in an elevated command prompt.
Please note that the export and import in this example is done on a x64 computer.
Export:
reg save HKEY_LOCAL_MACHINE\SOFTWARE\WOW6432Node\ideri\inotehkdef \
    C:\temp\Export_HKS.regexport
Import on target system:
reg add hklm\SOFTWARE\WOW6432Node\ideri\inotehkdef
reg restore HKEY_LOCAL_MACHINE\SOFTWARE\WOW6432Node\ideri\inotehkdef \
    C:\temp\Export_HKS.regexport
7.14.8. Recommendations
It is very difficult to give general recommendations with respect to the operation of the IDERI note Hotkey Support Components, because every customer environment is different from the other. However there still are a few things and rules of thumb to keep in mind for optimal operation of the IDERI note Hotkey Support Components as outlined in this paragraph.
- Operation with Terminal Servers:
Keep in mind that on terminal servers the execution of hotkeys on the logon screen is not only useless but also a security risk, because this screen can be accessed without authentication across the network. The IDERI note Hotkey Support Components therefore do not execute hotkeys that run from the logon screen in an RDP session. Hence, you can prevent the creation of inotehid.exe processes on the logon screen by setting the REG_DWORD value “RunChildAsSystem” to zero and save memory and processing power that would otherwise be wasted. You can also use the RUNCHILDASSYSTEM MSI property at installation time to achieve the same.
- Operation with the standard licensing mode:
Running with the standard licensing mode goes by the same token: If you only ever create new hotkey messages or updated hotkey messages to servers running in standard licensing mode, you can safely turn off the creation of inotehid.exe instances on the logon screen, because hotkey operations from the logon screen are not supported with servers running in standard licensing mode.
- Using message delays:
Using message delays can help you model something like an escalation/deescalation strategy for hotkey operations. Consider the case where you want to create a message with a hotkey press that is sent to users nearby the workstation, where the hotkey press originated. For this you would use the update of an existing message to these recipients with a zero delay as it was used throughout this tutorial. You would then add a second message to be updated with a different message index and more wide-spread recipients with a delay of e.g. 600 seconds to this hotkey. Both messages would now be updated with the same hotkey press, but since the first updated message has a zero delay, it would only be shown to the recipients nearby. This would allow nearby recipients to help deescalate the problem that led to the hotkey press in the first place, without bothering the recipients of the second message with the 10 min delay. In case the situation can be resolved within these 10 min, both messages can be canceled again and the impact of the messages sent is limited to the recipients of the first message. If the problem cannot be resolved within this period of time, the target audience of the problem is automatically widened since after the 10 minute delay, the recipients of the second message with the delay configured will be shown the second message. Using this strategy with multiple messages to be updated with a hotkey press, each with an ascending value for the delay, the target audience of a hotkey message can be gradually increased as long as the messages are not canceled.
- Choosing the right hotkey and modifiers:
Since there is no such thing as a “right hotkey and modifier”, this advice is more or less only a suggestion to avoid pitfalls that can only be encountered later, when it is already too late and you already have rolled out the IDERI note Hotkey Support Components and custom keyboard hotkeys assigned to a fleet of hardware devices. There is a number of considerations that you might want to keep in mind when choosing a hotkey: First of all, make sure you do not choose a hotkey that your users are trained to use with the software that makes up their daily business. Oftentimes, users are trained to use certain hotkeys with their LOB applications or their productivity software, so you should not use such a hotkey. Also think about the complexity of the hotkey. The more complex and awkward a hotkey is configured, the more difficult it will be to trigger the hotkey accidentally. Imagine a hotkey like F12 without any modifiers. This key is usually located nearby the Printscreen key and the backspace key and assigning it to an IDERI note hotkey bears the risk of accidental execution by users just working with their PC keyboard. However, using F12 with the Ctrl-Alt-Shift combination is probably not only rarely used as an application hotkey, it is also very difficult to execute it only by chance.
- Physically secure device access:
It probably goes without saying that access rights for the creation of IDERI note hotkey generated messages is moved by design to the Active Directory® computer object when using the IDERI note Hotkey Support Components, instead of the logged on user. It is not the user logging in with her user name and password or a smartcard that authenticates the user against the IDERI note server, but instead the fact that an administrative user has configured and enabled both a workstation with its Active Directory® computer account and the IDERI note server to allow the creation of IDERI note messages. It is therefore the responsibility of the customer to secure physical access to this computer and the hardware devices attached to it and used in conjunction with the IDERI note Hotkey Support Components in order to prevent accidental or malicious activation of a hotkey by unauthorized parties.
- Use groups for security configuration:
Use a group with a name like “IDERI hotkey computers” or similar for all Active Directory® computers that are equipped with the IDERI note Hotkey Support Components. Adding this group to the security settings of an individual message or to the general security policy settings (see section 4.4) in order for them to allow creation or update of an IDERI note message is beneficial. Use such an Active Directory® group of hotkey-enabled computers in tandem with only creating message operations that have the “Always send with computer account” checkbox ticked. This way no individual user has to be enabled for hotkey operations, so it doesn’t matter who is logged on interactively on a workstation with the IDERI note Hotkey Support Components installed and configured. Also keep in mind that a domain relative group for all Active Directory® computers with the name “Domain Computers” usually contains all computers joined to your domain, so you might want to consider adding this group to the previously mentioned security settings if all your domain computers are equipped with the IDERI note Hotkey Support Components.
- Testing hotkeys:
Make sure you test the operation of your hotkey-enabled computers outside business hours or during maintenance windows regularly, but especially after either operating system upgrades or after updates to the IDERI note Hotkey Support Components package. Read also section 7.14.3 for more information on convenient ways to test your hotkey configuration.